Do you want to improve how your landing pages show up when shared on Facebook, Twitter, or LinkedIn, or in places like Slack? Then you'll want to include Open Graph meta data for your landing pages, such as a page title, image, description, and more.
Open Graph is an internet protocol that lets you control how your pages appear when shared online—the "social card" you see when a link to your page is posted someplace else.
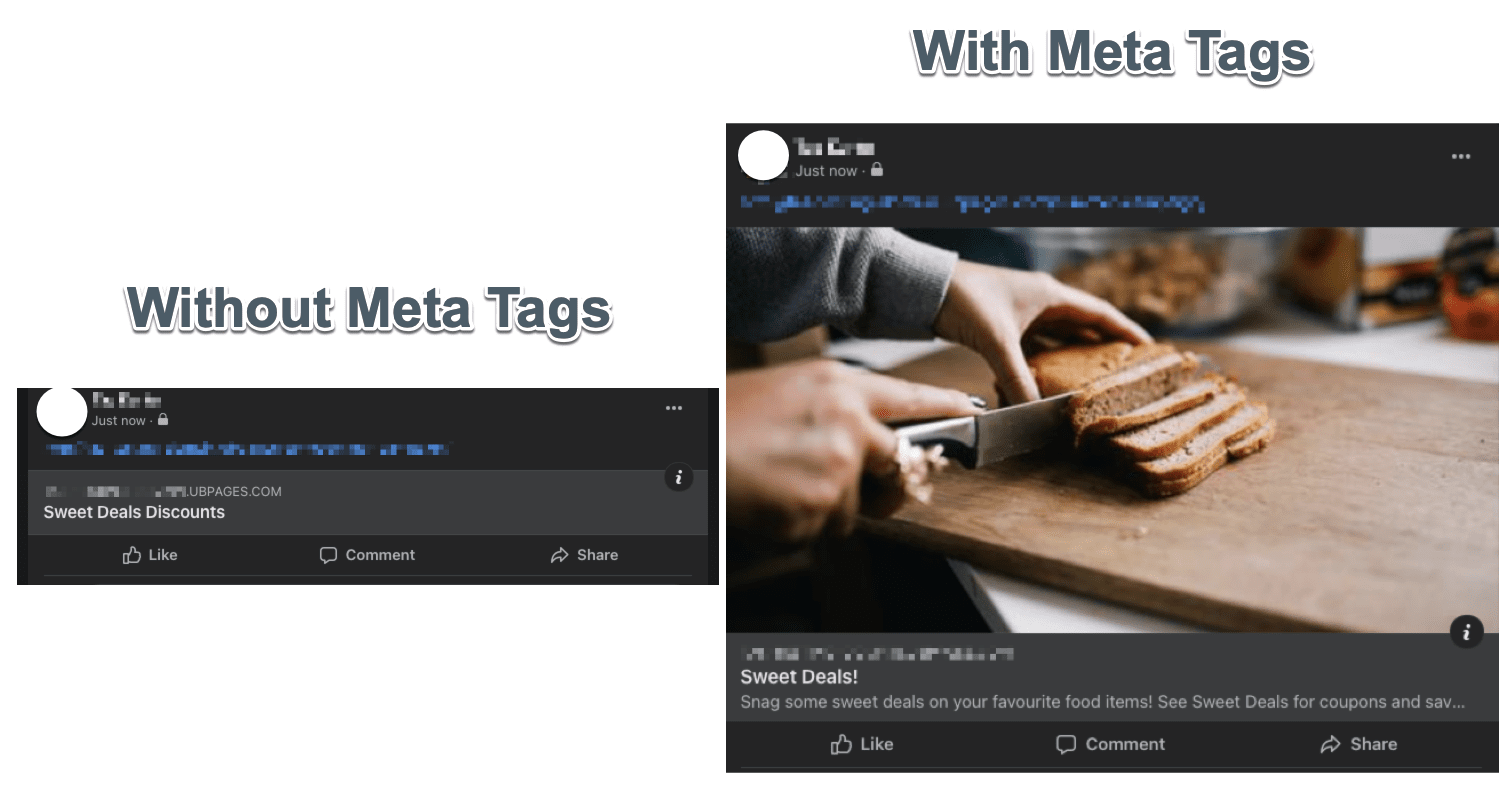
Here is an example of a page without Open Graph data (also known as "tags") compared alongside a page with Open Graph data:
This article will explain adding or updating Open Graph tags in Classic Builder.
To add meta tags in Smart Builder, see this article: Updating Page Settings & Metadata in Smart Builder.
Adding Open Graph Tags in the Classic Builder
Before You Start:
Find an image to use and upload it to an external image hosting service, such as Amazon Web Services (AWS). Read more about image hosting in the latter portion of this article.
Save the image URL. (You’ll need it later.)
Your image should be at least 600 x 315 pixels – but if you can, try to use images that are 1200 x 630 pixels for the best display across most social networks on high-resolution devices.
To add Open Graph tags to your landing page:
- Navigate to your page in Classic Builder.
- Click the “Page Properties” tab on the right side of your screen.
- Scroll down to the “Open Graph Meta Data” section.
- Enter the content type for your page. (A full list of Open Graph content types can be found here.) For Landing Pages, you can set Type to "website", which will insert this meta data in the HTML of your page:
<meta property="og:type" content="website" />
- Add a title and description. (Titles should be no more than 60 characters long. Descriptions should be less than 160 characters.)
- Enter the URL of your image. This will be pulled into your Open Graph social card automatically.
- Enter the URL of your page.
- Save and “Republish” your page.
That’s it! Now, when your landing page is shared on social media sites, it should display the title, description, and image indicated here.
Manually Adding Open Graph through Script
If you prefer, you can manually add Open Graph meta data through a bit of script. Here’s how:
- Navigate to your page in Classic Builder.
- Click the "Javascripts" button in the bottom left corner.
- Click "+Add new Javascript" to create an empty dialog box.
- Copy and paste the following code into the Javascript dialog box, and update the bolded values in the code with your Open Graph tag details:
<meta property="og:title" content="The name of your page goes here." />
<meta property="og:url" content="The url of your page goes here (for instance: http://go.unbounce.com/openhouse/"/>

<meta property="og:type" content="website" />
<meta property="og:image" content="The url where you’re hosting the image you want to use goes here (For instance: http://yourimagehost.com/yourimage.jpg)" />
<meta property="og:image:width" content="400 (add the width dimension of your image here)" />
<meta property="og:image:height" content="300 (add the height dimension of your image here)" />
<meta property="og:description" content="Your social media message goes here. (For instance: Check out my awesome Unbounce landing page!)" /> - Name your script and set the placement to the Head.
- Click the "Done" button to save your Open Graph tag script.
- Save and "Republish" your page.
You're all set! You can now share your fully customized social media post to the platform of your choice!
Note:
Though you must add this code within the Javascript section of the Unbounce builder, avoid wrapping the code with script tags (<script> or </script>); this can impact how social media sites crawl your page & search for these tags.
Refreshing your Meta Tag Cache
If you've shared your landing page on a social site before adding any meta tags, you'll need to request that these sites clear the preview cache of your page (i.e., display the most up-to-date version of your page).
For example, within Facebook, you can refresh your landing page via the Debugging Tool.
Input the URL of your published page into the debugger and choose Fetch New Scrape Information. If the new information doesn't appear in Facebook's debugger right away, wait 20-30 minutes and try again.
The same steps apply to LinkedIn or Twitter. Here are some tools that will help clear the cache on your pages.
Image Hosting & URLs
When adding in the image URL for your social card, you will need to ensure that the image is uploaded to a server; in other words, host your image.
If you have an image saved on your computer/laptop, you can ask your IT team to host the image on your company’s server. A quicker option would be to upload it to a hosting service such as Amazon Web Services or Imgur.

You can use either service to upload your image to their server and generate a custom image URL to use as an image for your Open Graph meta data.
Once you’ve hosted your image on a server, you will need to open the Image in a new tab, and use the specific image URL to add within the builder, as shown in the example above.