Unbounce's Webhook integration lets you send submissions from your form to any custom page or script you like.
This article will explain how to link your custom Webhook to an Unbounce landing page.
What's a Webhook?
A Webhook is just a push notification from our server to yours. The Form Submit Webhook lets you set up a push notification to your server every time someone submits a form on one of your Unbounce pages.
Note
We have no visibility into or control over your Webhook setup. If you are concerned with GDPR compliance, consider using Setting Up 'Integrations Powered by Zapier' instead of using a Webhook.
What Can You Do With a Webhook?
Webhooks make it easier to integrate two systems. The most common use for our Form Submit Webhook is to feed leads into your CRM. But there are lots of other things you could do as well, such as sending yourself an email or plotting addresses on Google Earth.
What Do You Need?
The very nature of a Webhook assumes that you have some ability to write code (or bribe a friend or colleague who does). You will require a server that can accept a POST request (like what you’d get from a form submission). You will also need to write a script that accepts the JSON or XML (Unbounce sends both), sends back a 200 response to the webhook, and then does something in response. If writing code from scratch seems intimidating, you may want to see if Unbounce's Zapier integrations can connect Unbounce to your 3rd party service for you.
Pro Tip:
You can use these setup steps to integrate your popups and sticky bars with your webhook. See Setting up Integrations With Popups and Sticky Bars to learn more.
Step 1: Write code to accept your form data
Headers
Whenever a page visitor of yours completes a form submission on your page, Unbounce will send the following data to your selected Webhook URL:
{
"content-type": "application/x-www-form-urlencoded",
"accept-encoding": "gzip, deflate"
}
By default the content type is application/x-www-form-urlencoded. You can also change the type to JSON or XML when configuring the webhook.
If the content type is JSON or XML, you can also remove or rename the fields that Unbounce sends to your webhook endpoint. See the below sections for more details.
Body
Example of a response body:
page_url: http://my-landing-page.ca/
page_name: My Landing Page
page_id: a2838d98-4cf4-11df-a3fd-00163e372d58
variant: a
data.json

{
  "email": ["test@test.com"],
  "ip_address": ["1.1.1.1"],
  "page_uuid": ["a2838d98-4cf4-11df-a3fd-00163e372d58"],
  "variant": ["a"],
  "time_submitted": ["10:57 PM UTC"],
  "date_submitted": ["2023-06-06"],
  "page_url": ["http://my-landing-page.ca/"],
  "page_name": ["My Landing Page"]
}

data.xml
<?xml version="1.0" encoding="UTF-8"?>
<form_data>
  <email>test@test.com</email>
  <ip_address>1.1.1.1</ip_address>
  <page_uuid>a2838d98-4cf4-11df-a3fd-00163e372d58</page_uuid>
  <variant>a</variant>
  <time_submitted>10:57 PM UTC</time_submitted>
  <date_submitted>2023-06-06</date_submitted>
  <page_url>http://my-landing-page.ca/</page_url>
  <page_name>My Landing Page</page_name>
</form_data>
Data Fields
Unbounce will send data in JSON and XML (data.JSON & data.XML) only. Please ensure that the code written for this Webhook is set up to receive these specific data formats.
| Parameter | Description |
|---|---|
| Unbounce form field IDs |
The existing fields you have in the Unbounce form (such as to capture email addresses, names, phone numbers, etc.) that you're mapping over to the Webhook. For example, if you have a field to capture a visitor's full name, and the field ID is "full_name", it will appear in the Webhook response as "full_name". |
| ip_address | The visitor's IP address. |
| page_uuid | The identifier Unbounce uses to identify your page uniquely. Eventually, you’ll be able to use this with our API to manipulate and get information about your page. This is a 36-character UUID, for example, "a2838d98-4cf4-11df-a3fd-00163e372d58". |
| variant | This identifies the page variant that the visitor saw when they landed on your page. The first variant is "a", the next "b", and so on. If you have more than 26 variants, the sequence will continue with "aa", "bb", etc. |
| time_submitted (in UTC) |
The exact time of the lead capture in the UTC timezone. For example, "08:12 PM UTC". At this time, UTC is the default timezone and cannot be changed. |
| date_submitted | The day of the lead capture, in the following format: YEAR-MM-DD. |
| page_url | The URL of the page that contains your form. |
| page_name | The name you gave your page, for example, "My Amazing Landing Page." |
* Be sure to return a 200 response to ensure our webhook sees the post as successful. Follow the HTTP protocol to send other response codes.
Step 2: Configure Your Webhook
Now that you've written code to accept your form data, you can configure your webhook.
- In the Page Overview screen, select the Integrations tab, then the Webhooks tab.
- On the right-hand side of the page, click +Add Webhook:

- Enter the URL you'd like your data to be posted to.
- Choose the Content-Type (Default is
application/x-www-form-urlencoded): -
Configure your Field Mapping and click Save Changes.
-
Wait for a few moments while we add your webhook.
-
If the webhook is added successfully, you'll see a dialog box confirming the successful addition of your webhook. Click Done to close the dialog box:

-
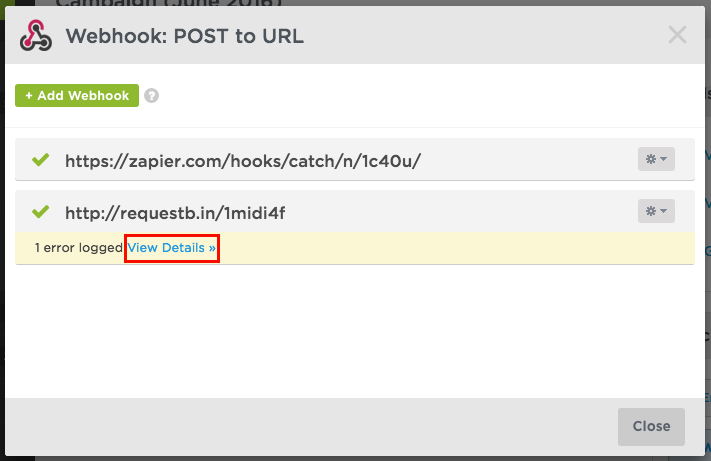
If you see an error, click View Details to resolve the issue:
-
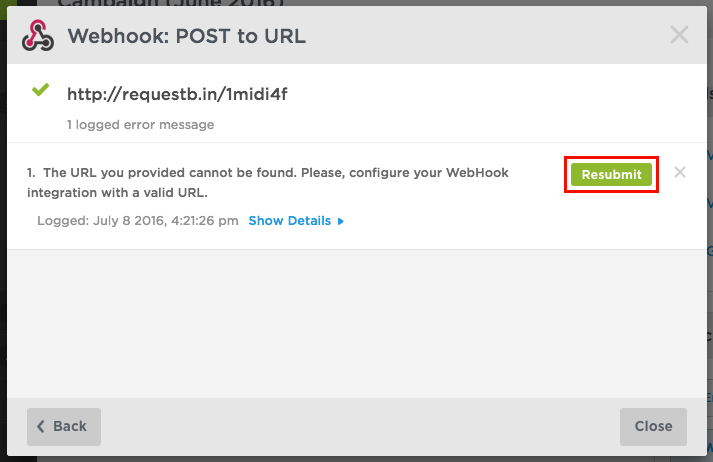
Verify that the URL is correct, and if so, click “Resubmit” to re-send the URL:
- You're all set!
Adding Custom Headers to a Webhook
Note:
Custom headers are optional and only needed if the service you’re sending data to requires them.
In some cases, the service receiving your webhook data may require additional information to be sent along with the request. Custom headers allow you to include this information when Unbounce sends form submission data to your webhook URL.
How to Add a Custom Header
To add custom headers to a webhook:
Open your page or popup and navigate to Integrations.
Select Webhook and choose Add a Webhook (or edit an existing webhook).
In the Custom Headers section, click Add Custom Header.
-
Enter the header information:
Header(s): The name of the HTTP header required by your integration (for example,
AuthorizationorX-API-Key).Value: The value associated with that header (for example, a token, API key, or predefined string).
Add additional headers as needed by clicking Add Custom Header again.
Click Save Changes to apply your updates.
When the webhook is triggered, Unbounce will include all configured custom headers in the HTTP POST request along with your form data.
Remove Fields
Note:
Only applicable if Content Type is set to JSON or XML
- When creating a new webhook, click + Add Webhook.
- When editing an existing webhook, click on ..., then Edit Webhook:

- Expand the Unbounce Page Data section under Map Fields.
- Delete the
Field to map tovalues for the field you want to remove by leaving it blank:
Rename Fields
Note:
Only applicable if Content Type is set to JSON or XML
You can rename the page_uuid field in your webhook payload to another value, such as custom_page_uuid, by following these steps:
- Remove the fields you'd like to rename by following the steps from the Remove Fields from Unbounce Page Data.
- Navigate and expand the Custom fields section under Map Fields.
- Add the custom field name and value:

Testing Your Webhook
Whenever you add a new webhook, it's always a good practice to make a test submission to confirm your lead data is being sent successfully.
- Visit the live version of your landing page and make a test form submission.
- Go to the Leads tab in your Unbounce Page Overview:

- In the Leads tab, click on your most recent lead. A panel will appear on the right-hand side of the page.
- Under Integration Details, you should see a green checkmark next to your webhook. The green arrow indicates that your data has been sent through the webhook successfully:

- Clicking on the integration status will reveal more information about the sent data. This data can be useful if you ever need to troubleshoot integration errors:

Troubleshooting Your Webhook
See the following guides:
Managing Multiple Webhooks
You can now create, configure, and manage more than one Webhook in Unbounce. This means any leads captured on your Unbounce page can be sent off to multiple custom integrations (including Zapier!).
Note:
As of January 2017, you can copy over Webhooks along with their field mapping when duplicating a page.
URL Parameter Replacement
There's also a handy feature you can use to do some simple customization of the URL you're posting to. You can pass data from your form into parameters in the URL the webhook posts to. This is useful for doing simple mapping of form field names to field names expected by the target script.
Let's say you had a form with a "name" field in it, and you wanted to pass this along as a "customer_name" field. You could specify your webhook's "URL for POST" as follows:
myamazingcompany.com/?customer_name=(name)
When a form is submitted, we'll replace the "(name)" token with the name field's value from the form. You can add as many parameters as you like; just be aware that some servers limit how long the query string can be.
Security
Our webhooks will be posted to your servers using known IP addresses (either 54.241.34.25 or 50.19.99.184). You can optionally update your firewall rules to limit posts to your servers from these addresses.
Glossary
WebHook: a push notification from our server to yours.
Form Submit WebHook: lets you set up a push notification to your server every time someone submits a form on one of your Unbounce pages.
The most common use of WebHook: to feed leads into your CRM.
PostBin URL: a place to temporarily send your form data